After extracting bridge.tar.gz file, run './configure', 'make', and 'make install'.
'brdg' and brdgadm will be built and installed on your system.
Where 'brdg' is a STREAMS module which enables briging 2 interfaces. And where
'brdgadm' is a configuration command to add/delete bridge interfaces.
Usage: brdgadm [ -a interface | -d interface]
Options:
   -a interface   : Add interface as port
   -d interface   : Delete interface from port list
   -l             : List all interfaces in port list
See following sample configuration.
Network configuration

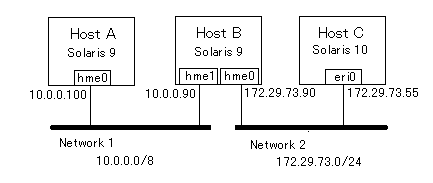
HostB is a router which is connected to 2 networks. By installing TAP and OpenVPN on HostB and HostC, I try to join HostC to Network1 through OpenVPN.
- On HostB, install TAP driver and OpenVPN, and then
configure it as bridging server using server-bridge
option.
-------------
dev tap
proto tcp-server
server-bridge 10.0.0.90 255.0.0.0 10.0.0.10 10.0.0.30
client-to-client
ca /etc/openvpn/keys/ca.crt
cert /etc/openvpn/keys/u1.crt
key /etc/openvpn/keys/u1.key  # This file should be kept secret
dh /etc/openvpn/keys/dh1024.pem
--------------
Then, run openvpn - On HostB, make and install bridge module.
- Extrace bridge.tar.gz
# gunzip -c bridge.tar.gz | tar xvf -
- Make bridge moduel(brdg) and control command(brdgadm)
   # ./configure
   # make
   # make install
- Extrace bridge.tar.gz
- On HostB, setting up bridge.
   # /usr/local/bin/brdgadm -a tap0
   # /usr/local/bin/brdgadm -a hme1
where hme1 is a network interface connected with Network1. As a result, tap0 and hme1 is bridged. At this time, ifconfig looks like as below.hme0: flags=1000843<UP,BROADCAST,RUNNING,MULTICAST,IPv4> mtu 1500 index 2 inet 172.29.73.90 netmask ffffff00 broadcast 172.29.73.255 ether 8:0:20:91:a6:90 hme1: flags=1000843<UP,BROADCAST,RUNNING,MULTICAST,IPv4> mtu 1500 index 4 inet 10.0.0.90 netmask ff000000 broadcast 10.255.255.255 ether 8:0:20:91:a6:90 tap0: flags=1000842<BROADCAST,RUNNING,MULTICAST,IPv4> mtu 1500 index 5 inet 0.0.0.0 netmask 0 ether a:0:20:14:32:52 - On HostC, install TAP driver and openvpn, and
configure it as a client.
------------
remote HostB
proto tcp-client
dev tap
client
persist-tun
ca /etc/openvpn/keys/ca.crt
cert /etc/openvpn/keys/onnv01.crt
key /etc/openvpn/keys/onnv01.key
-----------
Then, run openvpn. At this time, ifconfig on HostC looks like as below.hme0: flags=1000843<UP,BROADCAST,RUNNING,MULTICAST,IPv4> mtu 1500 index 2 inet 172.29.73.55 netmask ffffff00 broadcast 172.29.73.255 ether 8:0:20:c6:69:c7 tap0: flags=1000843<UP,BROADCAST,RUNNING,MULTICAST,IPv4> mtu 1500 index 4 inet 10.0.0.10 netmask ff000000 broadcast 10.255.255.255 ether a:0:20:53:71:52
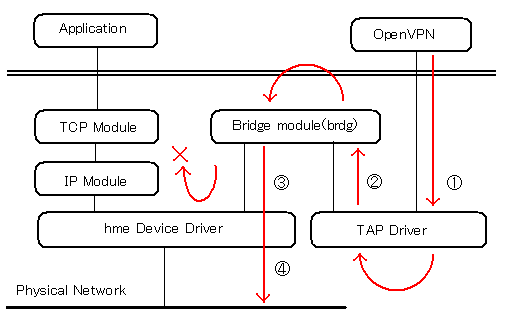
But, please note that there's some limitation.. HostC can't communicate with HostB using a bridged IP address on HostB. I mean, ping 10.0.0.90 on HostC won't work.

- Ethernet packet from OpenVPN headed to HostB is passed to TAP driver.
- TAP driver forwards packet to bridge module.
- Bridge module forwards packet to hme driver as RAW data.
- hme driver transfer the packet to the wire, but never forward it to IP module.
Of course, HostC can communicate with all the other hosts on Network1, but.. it can't communicate with bridged IP address of bridge server.
One more note. Once openvpn running on HostB is terminated, bridge setting will be invalidated. So, after executing 2nd openvpn on HostB, you need to re-setup the bridge again.
First, you need to drop existing settings.
   # /usr/local/bin/brdgadm -d hme1
   # /usr/local/bin/brdgadm -d tap0
Then, re-setup bridge.
   # /usr/local/bin/brdgadm -a hme1
   # /usr/local/bin/brdgadm -a tap0